


Few things are more important during the spring fit-out than a thorough yacht rigging and spar inspection. Duncan Kent runs through the priorities
During the spring fit-out we often appear to lavish far more attention on the engine and electrical systems than we do on the rig, despite the latter presenting a much greater risk to both yacht and crew should it fail in any way. However, because a yacht’s standing rigging has so many possible weak points it can be tricky to predict when any part of it is about to break. Close inspection should be a mandatory element of the pre-season preparations and checks.
A detailed rig check will rarely take more than a couple of hours to complete and should really be carried out prior to any long passage or extended cruise.
There are a number of telltale signs that should be looked for before, or soon after you launch for the new season, and several maintenance tasks that can be carried out to prolong the life of the rigging.
When inspecting your rig, it makes good sense to make an inventory of all the parts and their dimensions, as well as taking photographs of them.
It’s always advisable to un-step the mast every few years to check it over thoroughly at ground level. It makes close inspection of areas like the spreader roots, mast terminals and halyard sheaves much easier. If you are in any doubt about the condition of any part of the rig, it’s worth getting your local rigger to come and have a look.
This level of inspection may also keep your insurance company happy to continue covering an ageing rig, so it is worth doing every few years.

The mast step is a cast fitting under heavy loads and needs a thorough check
The spars
I always start the pre-season rig checks by inspecting the spars, commencing with the mast step and foot. The high compression forces on the mast step can put severe strain on both the T-bar (the plate on the deck) and step (the cast fitting that takes the loads in the bottom of the mast tube), particularly if there is any imbalance in the rig tension.
This is also an area where the salt water can gather in a pool, making it very prone to corrosion. Look closely at any rivets around the base and at the mast section itself for signs of corrosion or cracks. Get them looked at by a professional if there are working signs, to evaluate what repairs may be necessary.
With keel-stepped masts it’s especially important to check for corrosion at the foot as often they sit in the damp bilge and, being out of sight, are often overlooked. The same with the deck seal which, if leaking, will cause water to dribble slowly down the mast, creating a puddle at the foot. Replace any seals that are looking worn or perished.
With regards to the boom, first and foremost is the gooseneck. This is a common weak spot on any rig and one that has to withstand massive forces in several different directions when under sail. If it fails it can cause considerable damage, especially if it tears itself out of the mast, which will then be severely weakened. Always remove the main pivot bolt as, though it might look OK from the outside, salt water can drip into and settle inside the guide holes, seriously corroding the bolt just where it can’t be seen.

The gooseneck may look OK but it’s best to remove the securing bolt to check it
As with all the other mast fixtures, check closely for hairline cracks around the gooseneck fitting, either on the mast or on the fitting itself. This is best done using a dye, which will help make cracks more visible to the naked eye.
Other notoriously weak points on the boom are the vang fittings. They undergo similar stress levels under way, so it’s wise to give them the same once-over as the gooseneck.

All mast attachments and their locations are worth recording
Make a rig check inventory
When inspecting your rig for the first time it’s a good idea to make an inventory of all the components and their dimensions. Use a pair of Vernier callipers to note wire and pin diameters and measure the wire lengths as accurately as possible between pin centres at each end with full tension still in the rig.
For later reference, photograph each wire end, terminal, and mast attachment. The same for the lower ends, turnbuckles, toggles, and chain plates, taking note of the positions of the turnbuckles.
If wire stretch means they’re turned up so tight as to not have any further adjustment, compensate for that in your wire length measurement if replacing. The turnbuckles should capture one third of the screw length when fully tensioned.

Check chain plates for corrosion
On deck
Turnbuckles
Back at deck-level the turnbuckles (bottle screws) and chain plates must be closely inspected for cracks, rust, wear or distortion. The former require careful scrutiny as they can often sustain damage from misalignment, particularly if a seized toggle has been preventing free movement. They can also crack under the constant tension, particularly if the rig has been pumping in rough seas.
Toggles
If they have had plastic covers or been taped up there’s a good chance that trapped water might have caused corrosion, so remove and check underneath. Screw threads and locking nuts often need cleaning and regreasing. Slacken them off, giving them a few turns each way and removing clevis pins for inspection, before re-tensioning the stay and locking it off. Replace worn toggles, clevis pins, split pins or rings.

Don’t forget to uncover spreader ends to check wires and terminals
Chain plates
Finally, inspect the chain plates for cracking or distortion and tap the hull or deck around the plate lightly to and tap the hull/deck around the the plate lightly to ensure the laminate hasn’t absorbed water from leaky, dried-up sealant. Put a foot next to the chain plate and as you stand on it, check there is no flex in the deck. Go below decks, if you can, to check the bolts securing the chain plates to the hull, and now and again draw the bolts to check for cracks and corrosion. Do the same checks for forestay and backstay, especially if rust is visible. Ensuring any through-deck fittings are properly sealed will help prevent water ingress.

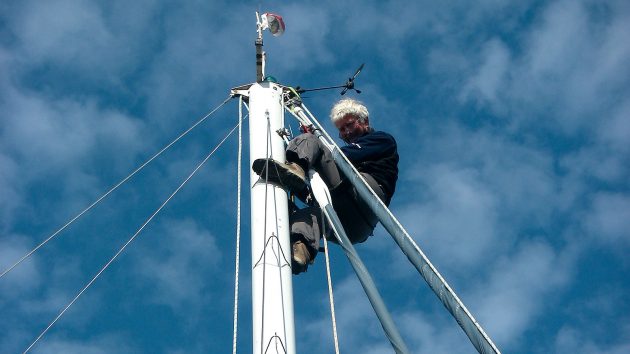
Choose a calm, dry day to inspect the masthead using the bosun’s chair
At the masthead
Once you’ve done all you can at deck level it’s time to go up the mast, so dig out the bosun’s chair and find a trusted mate to help. Most masts feature integral sheaves that rarely get checked during the season.
Remove the axle pins and sheaves to check for bearing wear and any flat spots that might indicate previous seizure. On reassembly replace any retaining pins or rings and ensure the sheaves spin freely.

Check for damage in the wire at the terminal end
The same goes with external halyard blocks, and you’ll also need to ensure any swivels are rotating freely. Remove any shackles, check for wear or distortion, then clean, lubricate and refasten them, replacing any that are worn or distorted.
Finally, securely seize them with new wire, ensuring there are no sharp wire ends to snag on lines or sails.
Next, check the mast fittings where backstay and forestay connect, ensuring clevis pins are straight and secure and the holes are not elongated.
Inspect the area around tang plates and toggle fittings for cracks, using a magnifying glass and dye.

Checking shroud tension with a gauge
Another common area of rig failure is where the shrouds are secured to the mast. Various connection methods are used, but all should be checked closely for wear, corrosion and/or cracking. Any sign of wear on T-ball type joints (often the indication of an under-tensioned or misaligned rig) means the terminal, socket, or both should be replaced.
Also, look to see if there is any rust or broken wires as the shroud enters the terminal. This will be easier if you slacken the tension off the wire, allowing you to wiggle the wire about.
As you work your way down the mast on the bosun’s chair, check the mainsail track is clean, straight, and well secured, giving it a good spray of track lubricant as you descend. At the spreaders inspect the roots and tips for corrosion or damage (particularly if they have plastic end caps) and ensure the spreaders aren’t bent or distorted.
Retuning the rig
When you’re happy everything is in a serviceable condition it’s a good opportunity to retune your rig, especially at the start of the season. If you do it yourself you should begin at the bottom, working your way up from the lowers, inters (if you have them), cap shrouds and finally the back- and forestays.
Adjusting the shrouds in pairs, first slacken them right off and then make a few turns on the turnbuckle one side, before going to the other and applying an equal number on the opposite shroud. Keep the balance equal on each side by counting the turns on each turnbuckle. This way you won’t risk deforming the mast or misaligning a fitting.
If you’re concerned about getting the tuning spot on, especially if racing is your thing, then it’s probably worth investing in a rig tension gauge such as a Loos gauge so you can tune your boat rigging effectively.
Yacht rigging Inspection checklist
- Mast and boom for cracks and corrosion
- Spreader roots and ends for damage
- Integral masthead and boom sheaves for seizures and flat spots
- Corroded or broken shroud wires
- Cracked, seized or rusty turnbuckles
- Toggles for wear and distortion
- Alignment of shroud fittings
- Furler and swivel bearings for wear and lubrication
- All shackles for wear and distortion, replacing seizing wire
Rig maintenance tips
- Ensure any taping of screws or pins cannot trap water, which will in time cause corrosion
- If you are taping over sharp edges, self-amalgamating tape will last longer than electrical tape
- Wash all moving parts with fresh water to remove salt residue
- Use a silicone-based lubricant regularly to keep moving parts free-running
- Avoid contact between dissimilar metals – use an anti-corrosion paste when using screws or rivets, and use plastic tape to create a barrier layer between fittings
- Rake out and renew sealant around through-hull fittings to prevent water ingress. If you are taking your rig down, take the opportunity to remove deck fittings and re-bed on new sealant
- Get your rig professionally inspected every three years, and let your insurance company know you’ve had the all-clear
Enjoyed reading this?

A subscription to Yachting Monthly magazine costs around 40% less than the cover price.
Print and digital editions are available through Magazines Direct – where you can also find the latest deals.
YM is packed with information to help you get the most from your time on the water.
-
-
- Take your seamanship to the next level with tips, advice and skills from our experts
- Impartial in-depth reviews of the latest yachts and equipment
- Cruising guides to help you reach those dream destinations
-
Follow us on Facebook, Twitter and Instagram.