


Knowing how to dry out alongside piles or a wall can save time and money for working on the hull, says Rachael Sprot
Whenever I launch a boat for the start of the season, I say a solemn goodbye to its bottom. As soon as it’s launched the underside becomes a foreign land, and one which will only be rediscovered at the end of the year. You hope that the anodes last and the critters don’t over-colonise its neglected flanks. But there are times when you need access below the waterline mid-season: perhaps there’s an odd vibration coming from the propeller shaft or you’ve had a grounding and need to inspect the damage. Or, even worse, just after you’ve launched you realise the new fridge anodes are still on the nav table.
This is exactly what happened to Jane Bradshaw and Soyoung Lee, owners of Jalan Jalan, an Island Packet 380. Would they bite the bullet and pay for another haul out during the season? ‘She’s got a long keel,’ said Jane, ‘and I’m not afraid to use it.’
Most yachts can stand on their keels if they’re given enough lateral support to keep them upright and longitudinal support to prevent them from tipping nose down or nose up. A long-keeled boat is better suited to the process, and I chose my own boat, Nimrod, partly because her long keel would allow me to do so more easily.
Fin keeled yachts can dry out too, though it needs to be done carefully. In a cradle, most of the weight is taken on the keel, with shores supporting the overhangs and beam. When drying out though, the bow and stern are fully suspended, and lateral support tends to be one-sided against piles or a wall. Some boats, especially those with bulbed keels, are not designed to take much compression load through the keel and to do so could be disastrous. If in doubt, check with your surveyor or the manufacturer.

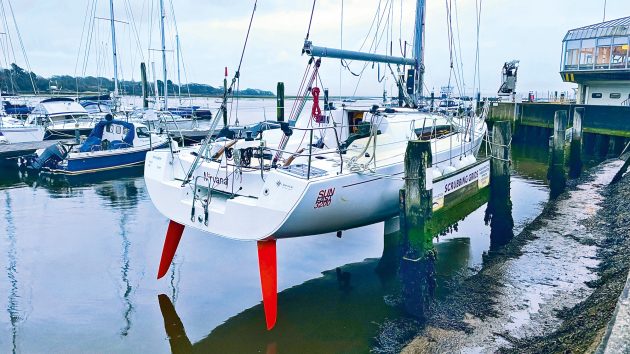
Jalan Jalan drying out in Warsash.
If it’s an encapsulated keel, there is the possibility of puncturing the laminate and allowing water ingress into the ballast cavity if the boat dries out unevenly on an object such as a stone or lump of rubble. The laminate on the bottom of an encapsulated keel is normally extremely thick, so it’s unlikely. Jalan Jalan has a substantial long keel which is also extremely wide, giving
her excellent stability ashore.
The first stage is to identify a suitable location. Purpose-built scrubbing platforms are one of the best options and are noted in the almanac and pilot guides, where the boat is supported by piles or a quay wall. Concrete pads are ideal as they provide a stable foundation to take the weight of the vessel, although firm sand and gravel can be used too, as can horizontal sleepers.
Drying out alongside – Calculations
There are several important metrics when choosing a location to dry out your boat:
- Tonnage: Most maintenance piles are rated to a maximum weight.
- Length and breadth: Check that the grid is long and wide enough to accommodate the keel. This is particularly important on a beamy boat such as Jalan Jalan.
- Distance between the piles: So that you don’t fall between them.
- Drying height: To calculate when you’ll ground and re-float, and when there will be dry ground below the boat.
- Distance between the pads: If they’re composed of several concrete plinths or railway sleepers.
Warsash on the Hamble has concrete pads on both the upstream and downstream side. Maximum tonnage is 20 tonnes and the maximum length is 15m. At 12m LOA and 9 tonnes displacement Jalan Jalan would fit in comfortably. The four piles are spaced at 7.5m, 7m and 5m intervals towards the shore. The piles closest to shore dry to 2.9m above chart datum, and the river end dries to 2.1m.

This information allowed us to calculate the point at which the boat would take the ground, for how long she would be fully dried out, and when she would re-float. With a 1.5m draught and 2.1m drying height, Jalan Jalan would touch the bottom at a height of tide of 3.6m. She’d be fully dried out at a height of tide of 2.1m.
A good weather window appeared and it was time to consult the tide tables. Warsash is a secondary port related to Southampton. The differences are minimal, but Jane calculated them anyway. We were coming off Springs with high water in the early afternoon.
The tidal curve gave a time of approximately 1637 for touching the bottom, with full access at 1747. The concrete pad would cover again at 2047 with refloating shortly after midnight. This gave a 3-hour window to tackle jobs below the waterline.

A scrubbing grid is ideal, but some places will have sleepers or a gravel bottom
It’s worth noting that we were well-afloat for the double high water which is a feature of the Southampton area. If we’d been close to the ground at high water, perhaps by using the shallowest set of piles (drying at 2.9m), we would have had a double grounding: firstly on the start of the ebb, then we’d have re-floated before the ebb began in earnest. Since it’s the moment of grounding which is most perilous, as this is when swell could bounce the keel into the slipway, doing it twice would have been stressful.
The speed with which you dry out and time on the ground is determined by where the critical Height of Tide falls within the tidal cycle. At neaps, working-time on the boat would have been much shorter and it would have taken almost the full tide to fully dry out. However, as it was only access to the bow thruster tunnel needed, using the dinghy whilst the tide was still dropping could have given a longer period of access. It’s impossible to know any of this without inputting each tide into the curve, though.
Article continues below…

How to take a tow
How to take a tow It has been said with justification that we learn more from our own mistakes than…

How to: moor a yacht alongside
Promotional feature in association with GJW Direct. Mooring a boat alongside securely will make manoeuvring easier, protect the boat in…
Shelter and reconnaissance
With tides worked out, you need the right weather conditions. Once the keel comes within a few inches of the ground any kind of sea state can cause the boat to pound, potentially damaging the bottom of the keel and putting stress on the hull-to-keel joint.
Even in calm conditions, the wake from passing traffic can create the same effect and taking the ground in a busy waterway is best avoided. A stiff breeze would add to the stress of what’s already a slightly nerve-wracking procedure.

Getting the balance right fore and aft is essential to prevent damage to moving parts
Marine surveyor Ben Sutcliffe explained: ‘Don’t dry out somewhere you don’t know. Ideally you should see the scrubbing location at the low water beforehand.
‘There have been instances of large accretions of sand and gravel washing across them and creating an uneven surface.
‘Take a shovel or broom to sweep away any debris.’
We had checked out the slipway earlier on in the week and since it was right outside the harbourmaster’s office, a quick phone call in the morning ascertained that the slipway was clear.

Have a look at where you plan to dry out – at low tide – before committing to the location
Preparing the boat
Take down roller-furling sails to reduce windage and weight aloft. Remove weight from the ends of the boat by emptying the chain locker and taking the dinghy off the davits (you may be needing it anyway). You need to induce a slight heel towards the wall or piles. We laid out the anchor and chain on the sidedeck, as well as some of the heavy spares from the cockpit locker.
You need to be confident that the boat won’t tip the wrong way, but you don’t want so much heel that the boat slips out sideways either.
Balance the boat
Shift or remove weight from the extremities of the boat, inside and out, and place centrally on the supported side.
Anchor chain
The anchor and chain are a significant weight in the bow that can be flaked out easily by hand on the side deck

Use fenders horizontally, although fender boards would spread the load better
Fendering
Since all the pressure is concentrated in a small area, careful fendering against the piles is definitely needed. Horizontal fenders are OK, but car tyres
or foam pads are better, or a fender board with several fenders behind it.
Positioning
Take care to position the boat so that she’s comfortably between the piles. As the boat dries out it’s better to be pushed onto the supporting piles by the elements, so decide which is the dominant factor: wind or tide and tie up accordingly. It takes a while to get the lines and fendering right, so make sure you’ve allowed plenty of time alongside before taking the ground. Lying alongside a smooth wall is easier than against piles.
Drying out is a labour-intensive process and not one to attempt singlehanded.

Place the boat equally between the pilings, taking care to position the keel where you know the concrete or sleepers are
Lines
The lines help to prevent the boat from falling outwards, so they need to be snug and well-led. You may want to lead them to the outside cleats to encourage her to heel against the wall. Having them on a winch so that they can be eased under load is also important. Some people take a line around the mast or a halyard to a bollard or kedge anchor. On Jalan Jalan there was a wide slipway adjacent with little to attach to. With the heel from the ballast on the side-decks and her substantial keel the chances of her tipping the wrong way were minimal.

The dinghy can make a useful place to keep things dry on the hard, and will be needed later
Getting off
Before you’re totally high and dry give some thought as to how you’ll get off. Have the dinghy ready, a ladder and a pair of wellies. A slipway is a filthy working environment. A bucket of water to dunk muddy boots into, or some slip-on shoes ready for when you’re back on deck, will save time on cleaning.
With Jalan Jalan’s long keel and heavy displacement the stern ladder worked well for access, but on a lighter, fin keeled yacht it wouldn’t have been so wise – disembark from the beam of the boat on the inboard side to avoid unsettling her. Avoid moving around too much internally, so gather the tools and spares you need and have them ready to go before taking the ground. The loo will be out of action, so spend a moment working out how to spend a penny.

Jobs such as accessing the bow thruster and anode could be done before the boat had fully dried out
The big reveal
A little earlier than calculated we felt a gentle bump as the front of the keel found the concrete slipway. The bow soon started to rise out of the water. The scrubbing pad has a gentle incline and with her long keel it took another half an hour for Jalan Jalan’s stern to dry out. During this period she felt tethered by the leading edge of the keel whilst the stern was afloat, which was quite unsettling. A flat pad, spring tides or a boat with a fin keel would shorten this process. The wake from a passing RIB disturbed her slightly and it was a relief when she felt solidly aground.
We soon had access to the bow thruster tunnel from the dinghy and about 30 minutes later we were able to work on the whole hull. The anodes and a defect on the bow thruster were addressed swiftly. Working against the tide certainly focuses the mind.

There was a maximum of three hours with the boat fully dried out to get all of the jobs done
With the jobs complete there was nothing to do except wait for the water to return in the Rising Sun pub conveniently positioned at the head of the slipway, having taken the dinghy with us. We re-floated at around midnight as expected. It was a perfectly still night and the process was so seamless that we barely noticed the lift-off. By this point the flood tide was pushing us against the piles so we waited for it to slacken off before reversing out. Taking the upstream side of the piles would have been the better option as Jalan Jalan would have been pushed into the piles for the vulnerable, drying out stage, and pushed off when we wanted to leave.
It’s a useful skill to have though. It saves on the cost of a haul-out when you need to tackle a small job below the waterline, allows a mid-season scrub which can save on fuel and shorten passage times and if you have an incident somewhere remote, it may be the only way to make temporary repairs. It also allows you to escape the marina scene.
Drying out isn’t for the faint hearted: once you touch the bottom you’re committed to the process. After your first drying out session your nerves may be slightly shaken. Have a bottle of something strong to hand in case your own anodes need restoring.
Enjoyed reading this?
A subscription to Yachting Monthly magazine costs around 40% less than the cover price.
Print and digital editions are available through Magazines Direct – where you can also find the latest deals.
YM is packed with information to help you get the most from your time on the water.
-
-
- Take your seamanship to the next level with tips, advice and skills from our experts
- Impartial in-depth reviews of the latest yachts and equipment
- Cruising guides to help you reach those dream destinations
-
Follow us on Facebook, Twitter and Instagram.