


After finding out what it’s like to be dismasted, Chris Beeson and the Crash Test Boat crew explore how to jury rig the remaining wreckage to sail back to safety

Crash Test Boat – Jury Rig
If you’re ‘lucky’ enough to be dismasted within motoring range of a port, all you need to do is cut away the rig, buoying the wreckage and noting its position if the water is shallow enough to recover it, then clear lines from over the side and start the engine. However, if you’re outside motoring range, you’ll need to be a bit more self-sufficient.
Unless you have a seriously injured crew member or the hull has been breached, you’re not in ‘grave and imminent danger’ so you may struggle to justify firing up the EPIRB, if you have one. Also bear in mind that, without your masthead-mounted antenna, your VHF radio range is limited to hand-held distances, maybe 10 miles, so calling for assistance could be tricky too. You could start firing flares but, unless there are boats around you, there’s very little evidence to suggest you’re not wasting your time as well as your flares.
However, you can take charge of your destiny by using the wreckage salvaged after your dismasting to set up a jury rig and get yourself home. The stump of our mast was the biggest piece of wreckage we’d salvaged, so we opted to use that – the bigger the rig, the more sail you can carry and the quicker you’ll get back. Also, restepping a mast stump is the most challenging procedure in jury rigging, because of its weight, and we wanted to make it reasonably difficult.

Masts don’t break easily but, if you lose yours, you can still get home safely
How we set up the jury rig test

Nick Eales’ SeaStart RIB tows us alongside
Due to the rigours of her life, the Crash Test Boat’s starter motor has packed up, so we asked SeaStart’s Nick Eales to tow us from Hamble Point Marina into the Solent just south of Hillhead, and stand by. To stop us drifting onto Hillhead’s lee shore, Nick held us in position while we prepared our rig – in open water this wouldn’t have been a problem. Once ready to hoist sail, we dropped the tow.
With so little sail area, we needed at least a Force 3 to get the boat moving. On the day we had a decent Force 4, gusting 5. Apart from a bag of shackles, we used nothing that wasn’t on the boat already. The stump’s height and strength were important in its selection for the jury rig but also, having spent the best part of three hours recovering it following our dismasting, we were understandably keen to use it.
Making a jury rig and testing it
With a brisk Force 4 southwesterly waiting to test our results, we set to work. Once again, Crusader Sails’ Paul Lees was our consultant – he has been dismasted three times and managed to sail home under jury rig on each occasion. Our best chance of maximising sail area was to restep our 5m (16ft 5in) stump, use the main boom as a yard and cut the mainsail to make a squaresail.
The first task was to assess exactly what equipment we had to work with. We needed lots of line, plenty of stout blocks, some 8-10mm shackles and sails, so we emptied our lockers, stripped blocks from the boom, lines from the stump and assembled all our kit in the cockpit.

Shroud base blocks were lashed through the block, not the swivel
The plan was to create a tripod of stays. We ran a forestay from the masthead through a block at the stemhead – the strongest one we had available, because this stay would carry the greatest load – and back to a halyard winch. The two shrouds were run from the masthead through two blocks lashed to toerails aft of the mast step and back to primary winches. The halyard winch was large enough to get sufficient load on the forestay and the primaries had the fairest lead from the toerails. An auxiliary backstay was also rigged, but wouldn’t be needed for the stepping.

Interlinked 8 and 10mm shackles were used to create rigging terminals on our stump’s masthead
With so much torn aluminium at the masthead, I wondered how we would attach stays with any hope of them not chafing through, but I needn’t have worried. Paul pulled the pin out of a 10mm shackle and fastened an 8mm shackle through one half of it. The 10mm shackle was then hooked over the stump’s masthead, leaving a nice smooth 8mm shackle to which rigging could be connected. This was repeated four times for the four stays and the shackles were duct-taped into place.

Interlinked shackles were duct taped to the jagged masthead, to act as rigging terminals
The shrouds were then attached using bowlines and run through their respective blocks. Also, remember to rig the halyards – one fore and one aft – before stepping the mast. We attached turning blocks to our shackle shroud terminals. For shrouds, we had to use standard 10-12mm multibraid rope, formerly used as sheets and halyards, in the knowledge that there would be a fair amount of stretch under the loads needed to hold the stump in place. Dyneema would have been a better choice – every boat should have some – but we only had a couple of 1m lengths and they were used to lash the shroud blocks to the toerails. We rigged the Dyneema through the blocks – between the cheeks and below the sheave – rather than through the blocks’ swivels, because the swivel is the weak point of a block.
Next, using turning blocks at the foot of the mast and blocks at the step, we rigged a line that could be tightened to keep the mast’s foot on the step during the stepping, preventing it from sliding off onto the sidedeck and over the side. Don’t be tempted to guide the mast foot by hand. The boat will be rolling heavily and if the mast foot slips, it could injure you or damage the boat.
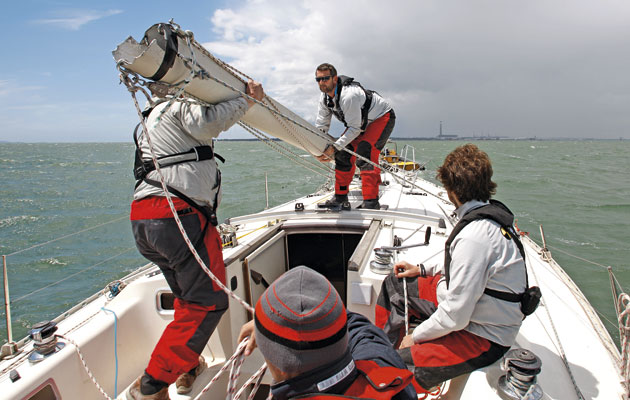
Stump stepped with brute force, winching in the forestay and easing shrouds
Now it was time to raise our stump. Had SeaStart not been there to keep us head-to-wind, we would have considered drudging the anchor or deploying some sort of drogue, a bucket for instance, off the bow to avoid lying beam-on to the sea. The mast’s head and foot were under control but we certainly felt safer working with the boat’s rolling minimised.
Paul and I shouldered the stump as far as we could, taking a few moments to make sure the mast foot was on its step and not the coachroof. Then in the cockpit, Andrew winched in the forestay while Mark eased the shrouds evenly to keep the masthead on the centreline. Once in place, with its foot on the step, the forestay and shrouds were winched in hard to soak out the stretch and keep the foot in position, then tied off to prevent accidental release. Now we addressed sail area.

‘Measure twice, cut once.’ Your resources will be very limited, don’t waste them
We had planned to cut above the second reef. As it happened, three reefs was perfect, but it’s worth checking twice before cutting. We planned to rig the sail upside-down by lashing the foot to the boom and using the third reefing points as clews, so the reef’s reinforcement would prevent the reefing, now clew, cringles tearing out of the sail.
We identified the second and third reefing lines in the boom, tied stopper knots in one end of one and the other end of the other, and pulled them through up to the knot. These would be braces for our yard, so that we could orientate it from the cockpit. In fact, the braces weren’t long enough to reach the pushpit base turning blocks and needed extending with other lines. The knots joining them jammed in the turning blocks so it might have worked more smoothly had we connected longer braces directly to the yard rather than using the reefing lines.

We used one of the three mast winches to haul our yard to the masthead
Next, the squaresail was lashed to the boom upside-down using the tack and clew. We attached sheets to the third reef’s leech and luff cringles and ran them back to the secondary winches through the genoa sheets cars, and tied on a couple of sail ties to control the sail. After attaching the fore halyard to a loop of Dyneema lashed to the middle of the yard, we untied the sail ties and hoisted our square rig.

Barberhaulers rigged through forward cleats helped us to generate more luff tension
Downwind, the rig worked well and we clocked up 2.5 knots easily. It took a few minutes to adjust to using braces and sheets but we soon got the hang of it and gybed – or more accurately ‘wore ship’ – through 160° True a couple of times before trying to bring her upwind. At 3-4 knots, we struggled to get above a beam reach. We needed to barberhaul the sail to get more luff tension, so we attached lines to the clews and ran them through forward cleats, then back to the cockpit.
This improved our pointing but we still couldn’t get her above 70° to the apparent wind on either tack, and speed slowed to 2.5 knots. In an effort to improve windward performance we dropped the squaresail and hoisted the small jib as a trysail with the tack as head, clew as tack and head as clew.

Our trysail was too small so we rehoisted the squaresail. This boosted speed and cut leeway
We pointed better with the trysail, but the drastic reduction in sail area slowed us and we made a lot of leeway, so effectively our progress to windward worsened. Then we rehoisted the squaresail and braced it as close as we could. Pointing improved 10° to around 60° apparent, but speed was still only 2.5-3 knots. Initially, we ran the trysail’s sheet through the pushpit base, but the squaresail was backwinding the trysail so we moved it to the binnacle.
What we learned

Strip the stump, mast foot, boom – everything. Work out what kit you have first, then how to use it
Having saved whatever you can after dismasting, take stock of the situation. Gather all your blocks, shackles and lines and plan your rig. Think about which winches do which jobs. If there aren’t enough turning blocks, what else could you use? Cleats, padeyes and pushpit bases should work.
With the shrouds and forestay occupying three winches, we had to run two braces, two sheets and two barberhaulers on three winches with two crew so we ended up using trucker’s hitches and cleats on some of the running rigging and prioritising procedures before manoeuvres.
Hang it high
Regardless of how clever your jury rig is, you’re never going to match the sail area you had before dismasting. The key to a successful jury rig is sail area – the more you have and the higher up it is, the better it will perform. That’s why we chose to raise the stump, the longest piece of wreckage onboard. If we had thousands of miles to go, we could have lashed the boom to the stump to make a taller rig and used the spinnaker pole as a yard for a square rig, or rigged fore-and-aft, maybe using the spinnaker pole as a mizzen. The possibilities are limited only by your kit and your imagination.

With lines controlling the stump’s foot and head, stepping it was easier than it looks
Stepping the mast
It took about a minute to get the stump from horizontal to vertical. It was lighter than I’d expected, and fairly easily handled by two people, even on a rolling deck, thanks to the line holding the mast foot in place and the shrouds keeping the masthead midships. Had it been too heavy to raise off the deck, we would have needed to fashion a gin-pole, possibly using the spinnaker pole on one of the mast step padeyes with lateral bobstays to both toerails. The forestay could then be run down to the stem and back to a winch via a hitch at the outer end of the pole, then winched vertical.
Once your rig is in place, there’ll be a noticeable reduction in the speed and frequency of rolling. Even our small stump dampened movement and the boat was a more comfortable place for it.
Which way is safety?
As we’ve established, if the nearest safe refuge lies to windward, a fore-and-aft rig is really your only choice. To get the height required to make it work, you will need to lash two bits of wreckage together.

In 2006, YM’s team lashed a boom and spinnaker pole together, hoisted storm sails and made 3 knots to windward with their fore-and-aft rig
In a previous test (January 2006 issue), the boom and spinnaker pole were lashed together and storm sails hoisted. The team also used trucker’s hitches on jury shrouds secured to midships cleats to get the required tension, which frees up the winches.
In 2006, the result was 3 knots to windward and a tacking angle of 100° in 15 knots of
true wind. There’s no mention of leeway, but it does state that, in 20 knots, the lashing was ‘over-stressed.’ It’s also worth noting that the 2006 jury rig was created and stepped in port. The lashing between the boom and spinnaker pole is the key to this rig and at sea, creating something secure enough to take on headwinds could be challenging.
Rig options
It’s quicker and easier to hoist sails in a fore-and-aft configuration but, with our shorter stump, so little of the sail area was up in the stronger winds a few metres above sea level that it generated much less power. The result was more leeway than headway, thus defeating the object. We did consider using the jib on the forestay, but having developed disappointing power as a trysail, it would have been next to useless with most of its area so close to the deck.
We also considered heading downwind with the cruising chute flying upside-down from the yard and appropriately ‘wine-glassed’ with a sail tie, but its asymmetric shape would have created a lop-sided rig and it would need hoisting outside the forestay. Though you have a finite number of sails, you have endless choice about how to fly them to get the most sail area at the greatest height. We opted for a squaresail rig. We could have clawed our way off a lee shore gradually but, as square-riggers have proved for centuries, we weren’t going to sail well to windward. We had a decent rig for half the compass.
Rig tuning
If we were expecting to take a few days to get home, we would have plenty of time to play around with the rig and sails, refining both, to iron out the problems and eke out the extra tenths of a knot in the directions we could sail.
I saw lots of chafe points, the mast turned slightly on its foot and the windward shroud’s stretching canted the mast so much so that we secured the fore halyard’s tail to the windward toerail to act as a second shroud.
Conclusion
Raising a jury rig is a challenge, right at the time you could do without one, but it’s far from impossible. The ability to do so – indeed, the ability to look at any scenario, assess the problems and figure out a solution – increases your self-sufficiency as a yachtsman and helps make you a better sailor. That’s what the Crash Boat project is all about.
Other Crash Test Boat tests