


Run aground? Chris Beeson and the Crash Test Boat crew tested every possible method of getting off the putty to find out what worked and what didn’t

Crash Test Boat – Aground

No depth, no speed. Hard aground
Provided you refloat without any damage, it doesn’t much matter how, but the aim of this test was to go step-by-step through the various methods, from simple to increasingly desperate, and assess how effective they are. Armed with the knowledge in this feature, you can react quicker and more effectively – and on a falling tide that might make the difference between a nuisance and a nightmare. The nature of the grounding will suggest what type of bottom you’ve found. Slow deceleration means mud, quicker deceleration means gravel, sharper still is sand and a dead stop is a rock or a wreck. Check charts to confirm but be aware that things can change – as a Yachtmaster Instructor, our consultant Simon Jinks once ran aground on a Ford Capri. If you’re grounded on rocks, use only the heeling techniques – don’t attempt to turn the yacht because you could rip out the keel.
First, change direction immediately

As soon as we could, we tacked, leaving the jib backed
Change direction while you still have way. As a general rule the genoa will haul the bow away from the wind and the main will bring it up so, depending on wind direction, try bearing away, tacking and leaving the jib backed or gybing, to go back down your track, or at least away from shallow water. This will most likely be a series of bumps – heeling, vertical, heeling – as the keel bounces down into deeper water.
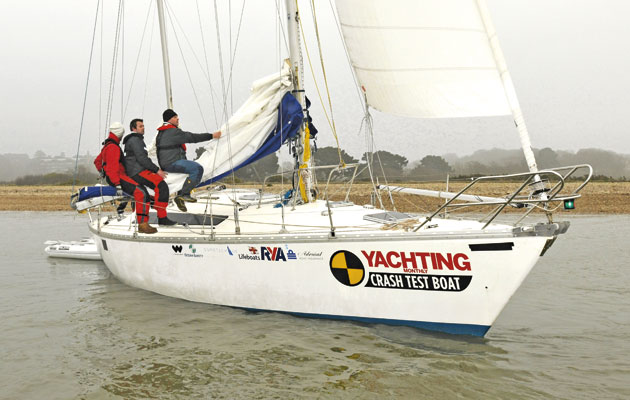
Hang off the shrouds to heel the boat

On the 40ft Crash Test Boat, three crew on the shrouds didn’t induce much heel
It’s generally accepted that you should get all but one crew to hang onto the downwind shrouds to increase heel, which reduces draught on fin and long keel yachts. In reality, however, we found that three stocky gents hanging onto the shrouds had little effect on the heel of the 40ft Crash Test Boat and, as a first response, backing the genoa (on a windwardshore) was much more effective if there’s any sort of sailing breeze.
That said, with a smaller crew on a smaller yacht, it might just make the difference you need if you react as soon as you run aground. In light winds it’s worth trying to heel her both ways. If you’re foreand- aft along the contour, heeling the mast offshore reduces draught and heeling it inshore means the keel may slide down into deeper water. Remember to furl the jib if it’s countering your heel.
Conversely, if you have twin keels and you’ve been sailing upwind, reducing heel will also reduce draught, so drop the main, furl away most of the jib and back what’s left. Another trick on long and twin keelers is to move any spare crew to the bow, which also reduces draught. This method is the only one available for skippers of wing-keeled boats as heeling will dig the wing tips into the bottom.
Start the engine and try to motor off

You’ll churn up plenty of sediment so check the strainer regularly
If your first response doesn’t work, check there are no lines over the side and start the engine. On a lee shore, drop sail, otherwise use canvas and crew to generate as much heel as possible. Select astern and give her plenty of throttle. If that doesn’t work, select forward and try turning hard to port then hard to starboard. This might loosen the mud’s suction on the keel or dig a hole in the shingle, allowing you to break free by selecting hard astern again. You’ll be stirring up the bottom a fair bit so make regular checks of the raw water strainer. After several hours of testing, ours remained clear.
If that doesn’t work, get everyone into lifejackets and switch them to manual if possible. In the next few minutes you’ll be jumping all over the boat so the chances of ending up in the water are heightened. It may be shallow enough that drowning won’t be a problem but you could be swept away by current and the lifejacket will keep you afloat long enough to be retrieved.
Put the crew on the boom end
Our ketch rig meant a short boom, which limited the effect of our combined weight at its end
Now get all but one crew out to the end of the boom to increase the heel generated by the backed genoa. Drop the main and check the gooseneck fitting. Secure the main halyard around the boom end to support the topping lift so that the crew weight is not supported by a single shackle or casting, run the lazyjacks forward to the mast, release the mainsheet and rig a foreguy from the boom end to the forward cleat to haul the boom outboard. Leave the engine running and get your crew to shimmy out onto the boom end while you try to reverse off.
Again, we found this made little difference to the heel of our boat but react quick enough and a little difference is all you need.
Check position and tide, survey depths

First, use a leadline at the bow to find out where deeper water lies
If you’re still not free, drop all sail, lift the cabin sole, check for water ingress and make sure the keelbolts are secure. Next, shut the stable door by checking your position on a chart to find out what the bottom is and where deeper water lies.
Also check the tide. If it’s rising, just wait for 20 minutes or so. If it’s falling, keep trying to haul yourself off. If you can’t, you have up to six hours to learn your lesson. The worst case is running aground at HW Springs. You could be there for two weeks.
Before setting any ground tackle, check for deeper water using a leadline – it needn’t be more complicated than a shackle on a length of knotted string – poled out using a boathook either side of the bow, beam and stern. If you don’t learn anything from that, launch the tender and leadline further afield to establish where the deeper water lies. While we were leadlining, the line would often be taken by the current so try moving with the current to get an accurate reading.
Make sure you don’t go further aground

Lower the bower anchor and chain into the tender very gently
Next, deploy the bower anchor in deeper water and deploy the kedge back down your track. On a lee shore in a rising wind, if you’ve tried all the above, securing position is your No1 priority – get the anchor and kedge dug in under deeper water and get both cables tight. Rig a trip line for the kedge because it’s likely you’ll need to retrieve and reset it.
Andrew was volunteered to handle the ground tackle and found the job fairly easy, but then he’s 24 years old, 6ft-plus and beefy. Stuart noted that most cruising yacht owners won’t fit that description and that dropping and resetting groundtackle by hand would represent a real challenge for most. It’s a fair point. The aim here is to test every possible method but only you can decide what works for you.
Having located deeper water, we used the tender to set the anchor and kedge. We were concerned about putting a hefty CQR and 30m of 12mm chain in our tender, half expecting the load to turn it into a rubber ring, but as we loosened the windlass clutch and gently fed out the chain, our borrowed Tetra Boats tender didn’t flinch. By mooring the tender to the yacht’s bow, we limited relative movement, making loading safer.
We shackled the anchor to the tender’s cleat and towed it in the water because it made launching much easier than heaving it overboard. If you have an electric windlass, give the throttle some revs in neutral and haul the cable tight to make sure the anchor’s set and that the chain hasn’t piled up on top of it. Without a windlass, hitch a line to the chain, or lead the cable aft, to a winch and get some tension in the cable.
In his book A Sea Vagabond’s World, Bernard Moitessier explained how he hauled his yacht off a lee shore by dropping the anchor then diving down repeatedly and walking the anchor further and further out into deeper water before hauling her off with the windlass. I tried it once in Greece and it is doable, but two things: it’s a decent idea in the clear, sandy-bottomed South Pacific, not so good in muddy Southampton Water, and a dinghy is much quicker anyway.

The bower anchor protects your position and the kedge could help you haul yourself back down your track
Marlow very kindly supplied us with 30m of 12mm multibraid (worth £94) to use as a kedge line and I would highly recommend having that length of cordage on board. As a kedge line it was invaluable in our test but it also means you have spare sheets and halyards if ever you need them. As any good chandler will tell you, better to look at it than for it.
We launched the Fortress kedge, fitted with a trip line, in the same way and ran its cable through a fairlead onto a primary winch, then wound until it was tight. Maintaining as much heel as possible and having loosened the bower anchor cable, we tried to winch her back down her track but the keel was too deep in the mud by then. We expected the kedge to trip but it gripped the mud admirably.
Attach halyard to loaded dinghy, then winch to induce heel

Move heavy kit into the tender and winch it up on a bridle through a boom end block – very effective
Next we tried another method of reducing draught. We loaded the tender with anything heavy – liferaft, toolkit, outboard, jerry cans, mooring warps, spare sails, etc – emptied the water tanks then tried to motor off again while winding on the kedge line. Then we moved the loaded tender round to the offshore side, attached the main halyard to the boom end and rigged a foreguy as before, rigged a bridle for lifting the tender, and ran the lifting line through a block on the boom end, then a jib car and back to a primary winch. The lifting line chafed on the lifelines so a block on the toerail would be a better choice. The bridle’s knot was soon up against the block so we lowered the tender, released the vang and mainsheet, hoisted the boom on topping lift and main halyard and lifted the tender again.
This was one of the more effective methods of simultaneously reducing draught and inducing heel but make sure your bridle is up to it – you don’t want to lose the tender’s contents.
Use the kedge anchor to winch her off

Clip the main halyard to a loop of line, attach a block, run the kedge line through it
Using the tender, re-deploy the kedge anchor in deeper water off the offshore beam. Run the cable through the forward fairlead and back to a primary winch and start grinding. This should haul the bow round towards deeper water, which gives the bower anchor cable a fair lead and brings the windlass into play. This will stress the keel root so send someone below to keep an eye on the keelbolts. If the wind is offshore, remember to keep the genoa backed and use the crew to heel. Many of these methods can be used simultaneously.
With the kedge well set in deeper water, we tried to increase heel by improving leverage using the mast height. If you have a spinnaker halyard with a swiveling block, tie a loop in its end, attach a block and run the kedge cable through it, down to a genoa car and back to a primary winch.
With plenty of slack in the cable, haul the halyard up the mast and start grinding the winch. In our experience this was easily the most effective method of generating heel. If you don’t have a spinnaker halyard, this method isn’t suitable because the halyard is likely to jump out of its sheave. Instead, as we’ve done here, make a loop in a length of gash line, fasten a block to the loop and tie it around the mast. Then attach a main or genoa halyard, depending on whether the kedge lies fore or aft of the shrouds, rig a downhaul on the loop, run the kedge cable through the block and, with plenty of slack in the cable, haul it up to the first spreaders. Run the cable down from the block, through a genoa car and onto a primary winch, then winch the kedge cable to induce more heel, simultaneously using the engine to drive her off.
Ever been pleased to see a motorboat?

With throttle on and crew out, some wake might be all you need
You could try using the ‘elevated kedge line haul’ technique with the tender (as above) to improve leverage, but we didn’t because it bristled with risk. First you would need to run the tender astern – to run forward could lift the prop clear of the water – and risk swamping the tender. Second, you would need to rig a quick release on the halyard because if you can haul her free and the mast becomes vertical, you could end up with a tender for a burgee.
Ever been pleased to see a motorboat? You will be now. Keep an eye out for any and ask them to motor around you, using the wake to lift you off while you motor astern. As keen for company as you may be, don’t get them stranded too. With our keel sunk 0.5m in the mud, there was only 1m of water around us and Lester had to trim his outboard up to keep it clear of the bottom.
If creating a wake doesn’t work, attach a tow line to the bow – make sure it’s your line to avoid any potential salvage issues – then very gently try to haul the bow around towards deeper water. Again this will stress the keel root so keep a close eye on the keelbolts and release the tow line if there are any signs of failure. Then rig a bridle and ask to be towed off.

The masthead tow is effective but it requires kid gloves and concentration
If you have a spinnaker halyard, you could also try a masthead tow but make it very clear again that the motorboat’s throttle must be used gently and cut completely if you can motor free. In sand, another option is to attach bow and stern lines to the powerboat and have her motor gently ahead, using propwash to clear sand from around the keel allowing you to float free.
If none of the above has worked, you’re clearly well on and will remain so until the tide refloats you. Next call the Coastguard on your VHF radio to notify them of your predicament. They will want to know whether you are safe, how many are on board and to establish a working channel. If you are on a rocky bottom, make sure they are aware that you will need to abandon if a rock pierces the hull. If you see any powered traffic, hail them on Ch16, or bridge-to-bridge Ch13, and ask them to slow down as their wake will bounce you on the bottom. Regarding day signals and night lights, we couldn’t find an aground day signal – three black balls – on sale anywhere so Graham bought three 99p footballs from a supermarket and wrapped them in gaffer tape. For the two all-round reds we needed at night, we bought two sets of emergency nav lights and used the red port lights.
Stuck fast? Make sure she leans uphill

Once hard aground, we used the ‘elevated kedge line haul’ to make her heel the right way
On a lee shore, the bower anchor should be set in deeper water to prevent you being washed up the beach when the tide rises.
Now you need to prepare for beaching. Having established where deeper water lies, haul her over so the mast lies towards the shallows. If you don’t, your mast could be horizontal or below, and downflooding becomes a real issue when the tide returns.
We dropped our kedge and bower anchor on the sand bar to guarantee we didn’t topple downhill. Then we used the elevated kedge line, hauled through a block attached to the spinnaker halyard and back to a winch through the genoa car.
Protect the hull at points of impact

We tried fenders in a bag but, even partially deflated, they were too buoyant
You need to protect the side of the hull when it comes into contact with the bottom. I had planned to fill a sailbag with our largely deflated fenders and haul it into place with lines under the bow and stern but I hugely underestimated their buoyancy – our well-built consultant Stuart Carruthers was standing on the bag and it refused to submerge – and friction on the lines under the hull meant we couldn’t haul it into place. This is the RYA’s recommended method of protecting the hull but, as Stuart noted, it doesn’t work.

At the last minute we tried kicking cushions into the gap, and failed
Finally, we tried to protect the hull with bunk cushions but it was too late – the gap closes remarkably quickly. We ended up with soggy foam cushions that weighed a ton and were still wet two weeks later. Also, as Stuart pointed out, had the boat been owned by one of us, the adrenalin would have been pumping and we’d havehad no qualms about getting a bootful and stuffing something – anything – between the hull and the bottom.
We decided that our boardbacked saloon seating would have offered the best protection, or the heads door stuffed into a sleeping bag. For a hypothetical grounding on rocks we considered shoving a partially deflated tender bow-first into the gap, hauling the painter under the hull, and re-inflating the tender. After our experience with the fenders, a more realistic choice seemed something board-backed which wasn’t buoyant.
Seal all hatches, lockers and through-hulls

Check keelbolts and empty ‘downhill’ lockers to inspect hull
Next, secure all hatches and cockpit lockers, cover your coachroof ports with storm boards if you have them. Remember, that when heeled the exhaust and heads swan necks may no longer work and could possibly allow water to run back into the engine or hull. If you’re drying on the same side as the exhaust, consider some means of stopping water entering the exhaust outlet and close all seacocks. You should also use duct tape to seal the fuel breather and heater outlets as required.
While you’re dried out, check the rudder and keel root as both may have sustained damage. Raise the saloon sole to expose the keelbolts for inspection. Empty hull lockers and remove saloon seating to expose as much of the downhill side of the hull as you can – if the hull does crack, you need to know about it.

Rudder and keel may have sustained damage. Check them while you can
Now you can settle down below, shutting the washboards behind you, and prepare for a very uncomfortable few hours at an angle that makes everything difficult. It was both unnerving and exhausting moving around on deck and below at 45 degrees – the galley was unusable – so I found a berth and slept for an hour.
In stronger conditions, or on a lee shore, grab the hand-held VHF radio, shut the washboards behind you, carry the tender ashore and wait for the tide to return. Notify the Coastguard that the crew is no longer on board. Perhaps you can phone a powerboat-owning friend and ask for help when you’re buoyant again.
Once she’s refloated, use the methods described above to get yourself off. You may have taken in a vast amount of debris in the engine water intake, driving the prop around and scouring the bottom. You have plenty of time to clean it, otherwise you may end up on the putty again… Drying out will drain water away from the engine intake so you may need to bleed the system with water through the strainer.
How to avoid grounding

Favour the windward side of a channel, it’s easier to get off if you ground and buys time if you have a problem
■ Use charts, tide tables and your sounder when sailing in unfamiliar waters.
■ Don’t sail too fast and know exactly where you are, using the GPS and the Mk1 eyeball, and what’s around you.
■ Look out for patches of short, breaking chop, and lighter or discoloured water – it could be a tide line but it could be shallows. You may also sense a general change in the boat’s motion.
■ If sailing in a channel, keep to the windward side so if you do touch, you can just back the jib and put the bow down.

Avoid surprises. Know where you are and what to expect
■ If sailing over unavoidable shallow water on your passage, make sure it’s on a rising tide and start early. Running aground is usually OK if it is slow, soft and with plenty of tidal rise left.
■ Keep a leadline on board. It needn’t be anything more complicated than a fishing weight or a heavy shackle tied to string marked or knotted in feet or metres.
■ In shallow water, sail the boat upright unless she is a bilge keeler, in which case her draught may be greater when she’s heeled over than on an even keel.
Other tests in the Crash Test Boat series