


Servicing a winch and keeping it running smoothly is not only part of good boat care, it's also critical to safety on board. The experts at Harken UK showed Theo Stocker how it's done

Winches carry huge loads. If the internal mechanism doesn’t work properly, the winch can spin and pass these loads straight through the handle, which can be enough to break an arm.
Keeping your winches running smoothly is a safety-critical job, as well making sail handling that much easier. The good news is that modern winches are evolving to make maintenance easier and reduce the time required for the annual service.
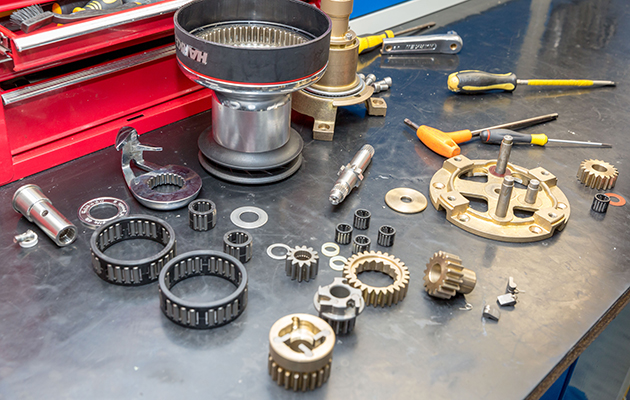
It is best to service your winches on a work bench
Once you know what you’re doing, it shouldn’t take more than an hour to an hour and a half to service a winch.
That’s a morning’s work for two of you on board.
It is worth doing at the end of the season before leaving the boat on the hard for the winter.
We went along to Harken’s customer service centre in Lymington, where senior technical service advisor Alun Hughes took us through the finer points of servicing a winch.
What you need for servicing winches
Servicing on a work bench is the best place to do it, and many winches can be unbolted from the deck surprisingly easily.
If you do it in situ, be careful not to lose small moving parts – pawls, springs, and bearing rings.
A piece of cloth or card taped to the deck and over the guard rails can help.

Or cut a hole in the bottom of a cardboard box and tape that over the winch as a catch-all device.
Cover your decks to protect them from oil or grease, and have a flat area to lay out the parts in order.
This will make putting the winch back together much easier.
Depending on the make, type and age of winch you’re servicing, you may need different tools.
Check beforehand what spares you may need so you can do the job in one go.
Tools you’ll need:
- Large flat-headed screwdriver
- Small flat-headed screwdriver (fine enough to get under pawl springs)
- Allen keys
- Plastic mallet
- Spare pawls
- Pawl springs
- Winch grease
- Pawl oil (machine oil)
- 1 inch brush
- Clean rags
- Containers for clean and dirty parts, or tray to lay them out on.
Another tool that can come in handy to hold the winch steady is an old winch handle, out of which you have drilled the locking mechanism.
This will let you unscrew the screw at the base of the handle socket
Things to look out for when servicing your winches
You’d be surprised how much muck can build up inside your winches.
This winch was serviced 12 months previously and, after a winter on the hard, was used on a racing boat for one season in the Solent.
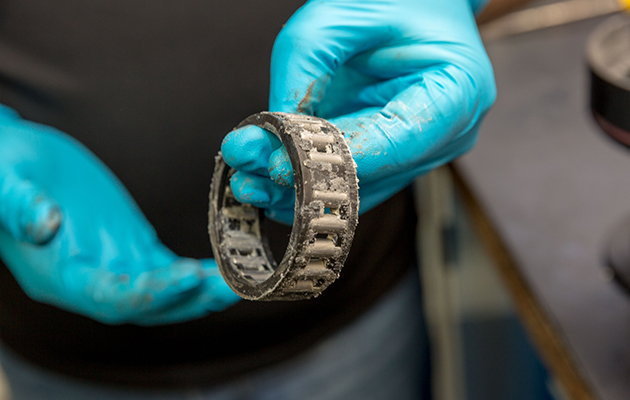
Bearings must run free
It is completely caked in solidified grease, salt and dirt.
The pawls are not free to spring into place – a real safety concern.
Clogged pawls
The bearings aren’t spinning freely, risking doing major damage to the winch.
Making sure that it’s clean is crucial to prolonging its life before it needs replacement, and preventing injuries on board if it back-winds.
Disassembling the winch

1. All winches will have some form of top plate holding the self-taling arm on and the rest of the winch in place.
Harken winches have a screw at base of handle socket, and once loosened the screw will remain captive.
First, remove the socket and top cover.
Lewmar winches have an O-ring that locks the stripper arm in place, and two small collets sit in a groove to hold the spindle in place.
Older winches such as those manufactured by Gibb and less modern Antal winches often have a circlip holding a top plate in place.
Andersen winches are secured with three screws.
On the Harken winch (above), there are three screws under the top plate to remove the self tailing arm.

2. Slide the main drum up.
While you are doing this, be sure to tip the top of the drum away from you so the base is pointing inboard.
Be careful when you are doing this because any bearing rings that have come off with the drum could slide out and roll away from you.
The inner drum assembly takes much of the lateral loading in the winch.
This means the bearing surfaces and ring gear are most likely to get gummed up with salt and dirt that has mixed with the winch grease.
Slide the bearing rings up and off the inner drum, carefully checking the bearing cage and bearings for cracking, scoring or any other problems.

3. Next, undo the screws holding the inner drum assembly together (found on the Harken winch).
It may need a light tap to loosen it – then lift it off and tip it away from you again, as there are more bearings inside.
Around the bottom of the inner drum assembly, your winch may also have a ring of bearings, though some have simple bushings.
It should not be necessary for you to take these bearings apart – a spray cleaner should be sufficient.
You should also check that there is a gap of a couple of bearings’ width so that the bearing can spin freely.
Be sure to have a look inside the inner drum assembly.
This may be the worst for salt and a build-up of dirt, as it is positioned immediately underneath the handle socket.

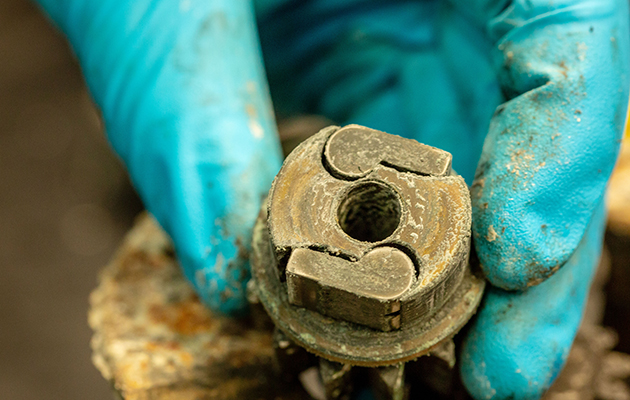
4. You can then remove the spindle and bottom gear.
The bottom gears connect the shaft to the drum, so take much of the rotational loading of the winch.
The bottom gear may need a screwdriver underneath it to persuade it upwards.
Place the whole assembly in a pot to avoid it getting muddled with other parts.
Inspecting the gears is a crucial step, as a failure here can result in gears not engaging, and the full load on the winch being passed into the winch handle,
If you find excessive wear, it could be due to dirt or lack of servicing, or the fact that the winch has been used in too high a gear.
Reversing the handle and using the easier gear sooner can help prevent wearing the edges of the pawls and gears.

5. When removing the pawls, make sure you keep the right pawls with the right gear, as these range in size from 8-12mm.
Do this for each of the gears, including the idler gear and main drive gear.
Check all surfaces and if they’re looking worn, cracked or dented then they should be replaced.

6. Pinions are the vertical steel pins around which the gears revolve.
On older Harken winches, these were set directly into the base metal but not supported at the top.
On newer winches they are supported top and bottom and held in plastic bushings.
On Lewmar winches, they are slotted in from above, in which case you’ll have to lift them out to remove the gears.
Any movement in these at all is a major concern.
If it is an issue you should definitely talk to the manufacturer.
The plastic bushings at either end of the gear pinions on modern winches need o be checked to make sure the bushings are not cracked or worn.
If they are, they can be easily removed, cleaned and replaced.
Cleaning and reassembling winches

1. A wipe down with a clean rag may be sufficient, but if there’s any more than clean grease, it’s best to use a solvent.
Professionals often have cleaning baths which most of us have access to.
Using mineral-based solvents such as diesel, petrol or thinners will work.
These shouldn’t be used if you’re doing the servicing on board, as they are environmentally harmful and can mark or damage decks.
Water-soluble degreasers such as bike cleaning products are better.
Pour 2 inches into the bottom of a bucket and use a stiff-bristled tooth brush to get all the grease out.
Flat bearing surfaces can be cleaned with a plastic scourer or Scotchbrite pad, but never use wire wool or a metal scraper.
Rinse the parts with a detergent to remove traces that would degrade the new grease.

2. If you’ve laid out the parts in the order they came off, putting the winch back together should be straightforward.
Otherwise an exploded diagram from the manufacturer will be a help.
You can re-grease each component as you put it back together.
Racing boats that are serviced regularly use oil to minimise friction, but suitable grease is fine for everything but these elite boats.
You’re aiming for a thin, even coat on any surfaces with metal-on-metal contact, with no blobs that will harden and gum up over time.
This is best done by brushing the grease on with a 1inch brush.
A white or coloured grease, rather than clear, will help you see if you’ve missed any bits.

3. When it comes to the pawls, the viscosity of grease can make these stick and stop the ratchet engaging.
The springs and pawls, and their housings, therefore just need a two drops of mineral oil – one below and above the pawl socket.
Use proper pawl oil here, as standard oils such as 3-in-1 are too light and will quickly rinse out.

When replacing the pawl spring, note that for some makes, one arm is straight from the circular part and the other is bent perpendicular.
The straight arm lies against the pawl, and the bent arm lies against the pawl housing in the gear ring .

4. Pinch the spring and pawl together and slide into the gear ring before replacing the assembly.
Give it a spin to make sure it’s engaging properly with the gear.
On modern winches the ratchet gear ring can be bi-directional, meaning its internal teeth will engage with the pawls whichever way it’s put on.
Every other year, flip over which way this is put on to prolong life.
Older winches need the gears to face one way.
Make sure the end face of the pawl sits flush against the gear ratchet and clicks positively onto the next one.
Place the pawl cover plate over the gear ring before greasing the shaft.
Finally, give the outside of the bearings a light brush with grease.

5. The main bearing rings of modern winches are self-lubricating nylon rather than metal.
They should just need a rinse off to remove the salt, though a little grease on the central bearing surface is a good idea.
With the central housing dropped back in place, replace the screws to be hand-tight.
If you have a torque driver, you can check this, but it’s not essential.
Tighten the screws nearest to the drive gear first and then work your way round.
If stainless screws go into bronze, it’s worth using Tef-Gel paste to prevent corrosion between dissimilar metals.
At each stage of reassembling the winch, spin the gears to make sure they are engaging properly.
Check you’ve put it all back together correctly.

6. Before you replace the drum, make sure the ring gear teeth around the inside of its base are all evenly coated with grease.
If your winch is self-tailing, replace the rope stripper.
Most winches give some options of how to line this up.
You want it pointing into the cockpit so line coming off the winch doesn’t go overboard.
The self-tailing gripper rings are held together with springs.
Continues below…

A guide to aluminium anodes
Protecting your boat from corrosion is something we all have to do, but what are the implications of switching to…

Why you should stop flooding your engine
Water in the cylinders is enough to destroy an engine, but it's easy to do by mistake, says Vyv Cox

Why you should regularly check your deck fittings
What’s really going on under your deck fittings? Ben Sutcliffe-Davies investigates the hidden weaknesses
If you’ve found thin ropes slipping in these, at this point you can add extra springs to increase their holding power.
Replace the socket and screw into place.
If your winch has a circlip or other fastening, replace this.
If your winch is screwed together, you can use a drop of Locktite 243 to protect against vibration, but it isn’t essential.
Insert the winch handle and make sure the winch works in both directions.
For all the latest from the sailing world, follow our social media channels Facebook, Twitter and Instagram.
Have you thought about taking out a subscription to Yachting Monthly magazine?
Subscriptions are available in both print and digital editions through our official online shop Magazines Direct and all postage and delivery costs are included.
- Yachting Monthly is packed with all the information you need to help you get the most from your time on the water.
- Take your seamanship to the next level with tips, advice and skills from our expert skippers and sailors
- Impartial in-depth reviews of the latest yachts and equipment will ensure you buy the best whatever your budget
- If you are looking to cruise away with friends Yachting Monthly will give you plenty of ideas of where to sail and anchor