


Whether your tank is half full or half empty, knowing what’s in your tanks and trusting your means of checking is critical to successful cruising, writes Theo Stocker

You don’t want to arrive at your favourite anchorage only to discover that you’ve run out of water, your holding tank is full and there’s no gas left to cook dinner, or risk running out of fuel at a safety critical point of the navigation. You can carry spare cans and bottles, but it’s better to know where you stand with your tankage before you run dry. Being able to see what is in your tanks is crucial to a successful cruise.
Gauges that work reliably, accurately and are easy check are therefore important tools. This is often harder than it sounds, with tanks hidden away in inaccessible spots and electrics having to work reliably in damp environments. So, is there a way to ensure that your gauges are telling the truth?
Thankfully an increasingly wide array of gauges are available, and new, integrated ways of reading them and even setting alarms means that there should be a gauge that suits your boat, whatever kind of tanks you have.
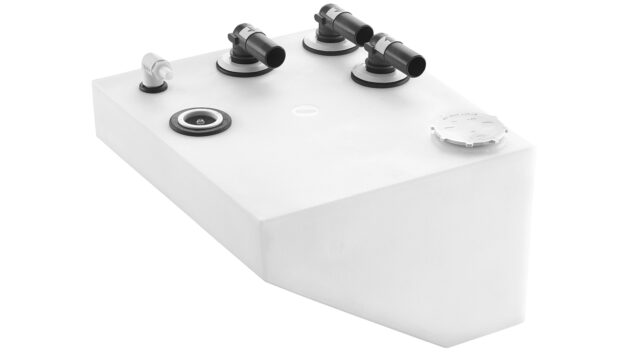
Plastic tanks can be standard or bespoke shapes
Types of tanks
Tanks on board yachts tend to come in three varieties: metal, plastic and flexible. There was a time that boats were also built with integral fibreglass water tanks, but they tend to suffer from osmosis, and have been anecdotally linked to various forms of cancer. If you do have GRP tanks, it’s best to fit a flexible liner inside it, or have a solid tank made to fit into the space.
When it comes to solid tanks, galvanised or painted mild steel tanks will rust eventually, though it is the preferred material for gas canisters. Stainless steel is commonly used for both water and fuel, being impervious to odours, tastes and chemicals. Plastic tanks are becoming increasingly popular too.
Made of rota-moulded high density polyethylene, they are robust, and can be bought off the shelf in a huge range of shapes, sizes and colours, or made to order to fit the space on your boat. You need one made for the intended use so that you know it’ll keep smells and fuel in, or provide food-safe storage for your drinking water.
Finally, flexible water tanks are generally a thick plastic sack inside a protective fabric cover. They are the cheapest and easiest type of tankage to fit, and come in variants for fuel, water and black waste.
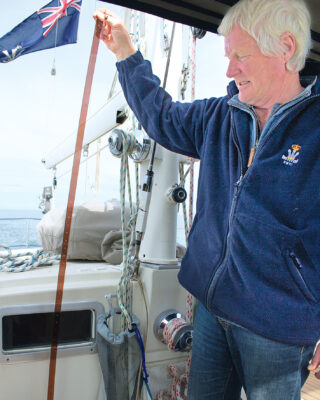
Amel build in redundancy, like this fuel tank dip stick
Manual gauges
When it comes to measuring what’s inside the tank, it depends on what kind of tank you have. Having redundancy built into all of your systems is a good idea, which in this case means having multiple ways of checking what’s in your tank.
The simplest way to know what’s in your tank is to be able to visually inspect what is inside. If you can see the side of your tank, a clear plastic tank will reveal the fluid level. If it’s not clear, put a torch against the tank and it’ll become more obvious. For metal tanks, you can have, or add, a sight tube – a plastic or occasionally glass tube that attaches to spigots on the top and bottom of the tank and give a ready indication of the level.
Diesel will tend to discolour plastic sight tubes, but you can add a brightly coloured fishing bead float to the pipe to make it more visible, as long as the bead is large enough to stay in the tube and not pass into the main tank.
Failing that, being able to dip your tank is a good backup. If you have the option to have a blanked off spigot into the tank, then this can be used for dipping the tank.
A sight tube is an easy, analogue way of checking levels
You can mark off increments for known volumes on the stick for quick reference.
Some boats, notably Amels, which are very good at the back-to-basics, belt and braces approach, built sight tubes and dipsticks into all of their tanks as standard.
There is no easy way to definitively measure what is inside a soft tank as the bag inside collapses as it is emptied. Looking at the bag itself can give a rough estimation, but it won’t a precise measure.
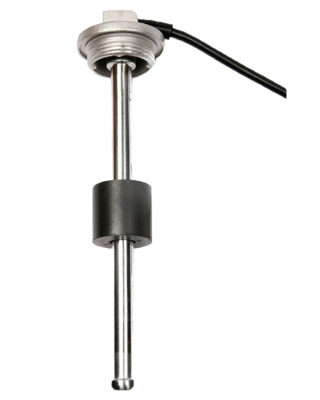
Electrical senders use a float to change their signal
Electrical senders
There are an increasing number of electrical senders available. Older versions use a float on a column to vary the resistance in a circuit that sends an analogue signal to your gauge. Basic models will simply tell you where the float is against the column, rather than a calibrated measure of when you’ve got half your liquid left.
More advanced models can be calibrated by the manufacturer if you send them a diagram of where your quarter, half and three quarter marks are relative to the top of the tank. This means that when the gauge says half, you know your tank really is half full (or empty, depending on your perspective).
More modern senders will send a digital signal that can then be integrated into your data network (eg NMEA 2000) and from there displayed on your instruments. You can do the calibration yourself on this one by finding the tank sender calibration menu, and telling the system when you’ve reached your empty, half, full and other points. The beauty of the more advanced system is that you can also set alarms, for say, quarter empty, giving you enough warning that it’s time to fill up again.
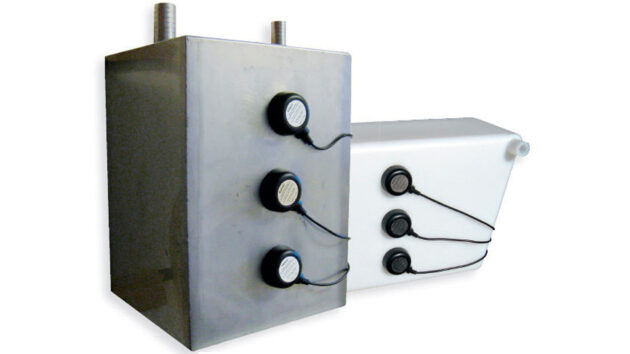
Gobius Pro sensors attach to the outside of a tank without any moving parts
External senders
The final kind of sender has been developed predominantly for holding tanks where (ahem) solid matter can clog up a float sender and prevent accurate readings.
The first sort involves sensors stuck to the outside of the tank at set intervals, which use vibrations to sense if there is liquid at that point inside the tank. They work through plastic and metal and connect with either wires or Bluetooth, and a display near the tank to tell you when you’re getting full.
The lack of holes and moving parts inside the tank makes these ideal for blackwater. The latest sensors, such as Gobius C, involve a micro radar mounted on the top of the tank to measure, to the nearest 2mm, the distance to the top of the liquid and the exact amount in the tank, transmitted via Bluetooth, analogue or NMEA 2000.
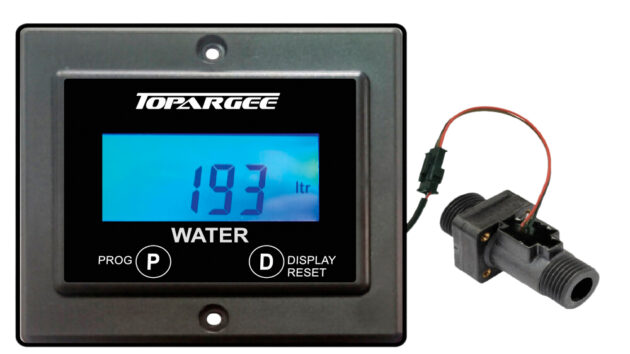
The Topargee flow meter shows tank levels based on water usage
Flow meters
As for soft tanks, if giving the bag a wobble isn’t accurate enough for you, you can buy a flow meter that is calibrated to the total amount the tank holds when full. Rather than measuring what is still in the tank, it measures what has been used, and gives you a remaining amount as a result.
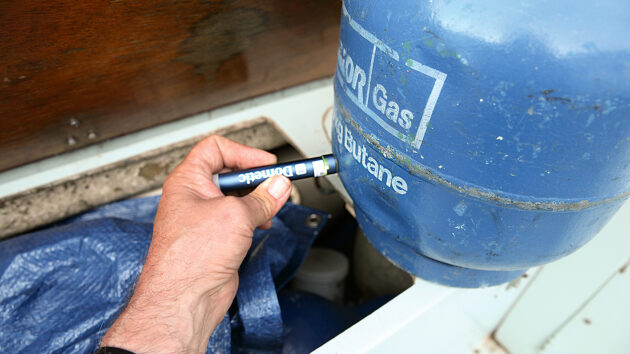
The light turns green when it finds liquid gas
Gas canisters
The ultimate measure of when a bottle is full is done by weight, but this is far from easy afloat. Dometic’s Gas Checker 100 is a battery-operated pen that when held up to a gas bottle glows red when it detects no liquid, and turns green once you slide it down to a level where it detects gas. It’s a simple idea that’s good for an occasional check.
Fitting new water tank gauges – By Roger Hughes
Over the years that I have owned Britannia, I’ve expended endless hours and patience messing about trying to get my original twin water tank gauges to register correctly. Britannia has two stainless steel water tanks amidships, one each side, triangular in cross section, tapering to a point at the base.
This makes accurate calibration difficult because when the water is half way down the deepest part of the tank, the actual capacity is only about one third full. I considered fitting external sighting tubes, but since my tanks are enclosed by bulkheads all round I couldn’t easily drill a hole in the bottom of the tanks to install the required plumbing fittings and clear plastic tubing.
Even if I’d been able to fit a sighting tube to each tank I would still have had to physically calibrate the tubes at various capacity levels, and lift up the floor-boards every time I wanted to read them.
The original pneumatic fuel gauge sender
Original system – pneumatic
Britannia’s original water gauge system was pneumatic (that is, air operated), which was supposed to read the air pressure differential as the water level in the tanks varied. A simple concept with just two components and no electrics, but the system failed to work properly and the gauge would frequently drop to zero, I think due to air leaks. I decided to look for a reliable alternative.
Electrically operated
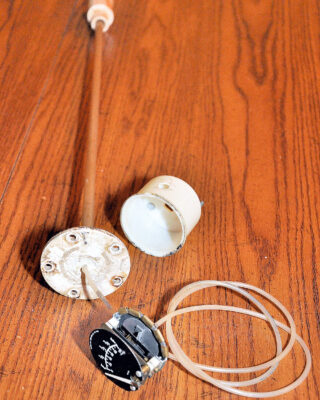
I then found an electrically operated device, manufactured by KUS and available in the UK via Amazon, that also uses a vertical tube in the tanks, but instead of working on air pressure it has a float that travels up and down the tube, activating electrical signals inside the stainless steel tube that are then read by the gauge.
KUS’s technical department were extremely helpful and told me they could custom calibrate the tank tube to my exact tank shape. All they needed was a drawing showing where the various water levels were in the tank corresponding to full, 3/4, 1/2 and empty. This would ensure the gauge read the correct ‘capacity of water’ in the tank throughout the whole range.
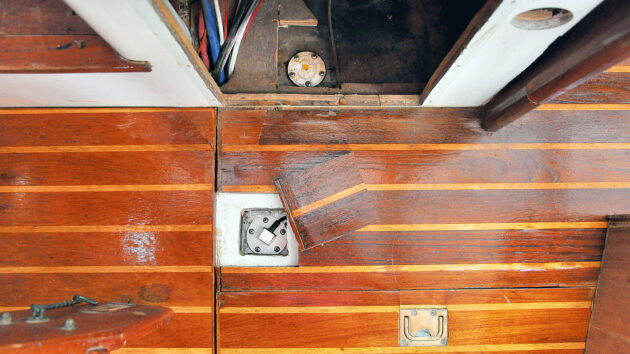
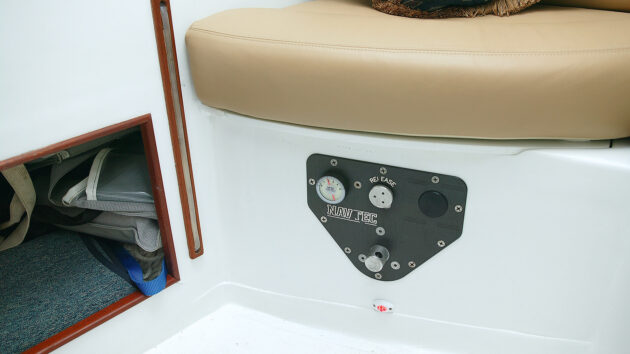
The new sender installed in the tank below the cabin sole
The KUS system can also have a dual gauge mounted onto a single panel with a switch to read either port or starboard tank. Switching to one side, the gauge reads from one tank and from the other it reads from the other tank. In the middle the switch is off and no electric current is being used. However, for this gauge to register accurately for twin tanks, both sides have to be the same shape, which, thankfully, mine are.
Calibration
I then needed to find out exactly how much water the tanks actually held. So I drained both sides, then refilled them one at a time using a flow meter fitted to the water hose. The capacity turned out to be 634 litres each side, a total capacity of 1,268 litres.
To find out exactly how long the new tank sender pipes needed to be I removed the old tube and measured the depth with a length of 6mm wooden dowel. This read 79cm (31in) to the bottom of the tanks, but the sender tube would not fit to the bottom of the tank because of the curvature, so I settled for 74cm (29in).

The two new KUS senders and gauge
Having determined the capacity I drained the tanks and took the opportunity to flush them with 2 gallons of swimming pool chlorination liquid. I then ran 159 litres into the tanks, and physically measured the water level 48cm (19in) from the top of the tank. Then I added another 159 litres and measured where half full actually was, then another 159 litres to bring the capacity to three quarters. I added these dimensions to my drawing and sent it to KUS. I received my kit in two weeks.
I drained the tanks once again, then lowered the starboard tank sender tube through a hole in the top of the tank. The gauge was relatively easy to fit, and I ran the wiring through a spare contract breaker on the master panel.
It was then just a matter of refilling the tanks in one-quarter increments using my flow meter and checking that the gauge registered it correctly, which it did all the way through to completely full.
Of course the reading from even a simple sighting tube will be incorrect when a yacht is heeled. The total cost for the two sender tubes and the dual gauge panel was around £250. It would be cheaper if you didn’t have a custom calibrated model. KUS also makes a similar system for fuel tanks.
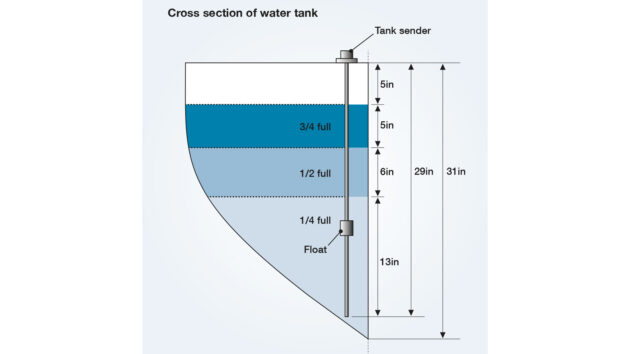
Measuring the volume for an irregularly shaped tank
Calibrating for tank shape
Because boats are made largely of curves on almost every plane, it is rare to have a tank that is absolutely square-sided and often the tank will narrow towards the bottom. This means that a liquid level of halfway from top to bottom rarely means you’ve got half a tank left, as there will be more volume at the top.
Instead, the proper way to do is it is to measure how much liquid is needed to fill the tank, then empty and refill to quarter, half and three quarters by volume, and mark the levels on the side of the tank, on the sight tube, dipstick, or in your electrical gauges.
When it comes to measuring how much liquid you put in, you can either do it litre by litre from a measured container or bucket, or rather more easily, hosepipe flow meters are available from hardware shops for about £30 (you can verify their accuracy by filling a measured container before you start with the tank).

Remote monitoring systems like Yacht Sentinel let you check fuel and water levels remotely as well as monitor engine performance for early warning of possible faults
Digitising analogue signals
Advances in common rail diesels, fuel-injected outboards and DC electric motors have led to very accurate monitoring of fuel or energy use, writes Jake Kavanagh. The data can be presented on any modern chartplotter or compatible mobile device, and companies like Actisense and Maretron can also provide plug-and-play modules that digitalise analogue readings. This means older engines with legacy gauges and dials can have their performance displayed as colourful digital data, and in real-time.
Careful monitoring of the boat’s fuel consumption in various sea states, degrees of bottom cleanliness and different loading will help a boat owner assess the optimum settings for the engine. There is even software available to detect subtle changes in performance and fuel consumption that may indicate a fault.
These apps and programmes were originally intended for charter fleet managers, to help with preventative maintenance, but examples from the likes of Yacht Sentinel are available for individual boats.
Performance data can also help assess if the correct propeller is fitted, especially as the speed is calculated with a high degree of accuracy by GPS. Not only will the sensors detect the speed through the water, and compare this with the exact number of revs, but they can also relay engine, water and exhaust temperature, fuel flow and other relevant factors.
With the power off, identify which wire is which
Maintenance & repairs
A tank’s sender will normally need very little maintenance, writes Bruce Jacobs. The kind that attach externally to the tank should need no maintenance other than checking they work and the wiring and power supply is in good condition.
For float senders, it is good practice to check that they are working properly, possibly against another means of measuring the tank, in case they are sticking at any point. Often, corrosion at the wiring joints can also interfere with readings. In some cases, sticky diesel fuel or fuel bug has been known to jam a float sender, which then needed cleaning.
It’s worth checking if you are inspecting your fuel anyway. Fuel tanks should be kept topped up over winter to prevent condensation and fuel bug, although some sources are now advising to empty any fuel with bio-diesel content as this doesn’t like to be stored for long periods. If you keep your fuel full, treat it with a stabiliser and bug treatment.
It’s also worth keeping your tanks in good order generally. For water tanks, empty them out when the boat is unused for long periods or ashore over winter to prevent freezing damage. Holding tanks should be similarly emptied and treated with deodorising fluid, available from chandleries.
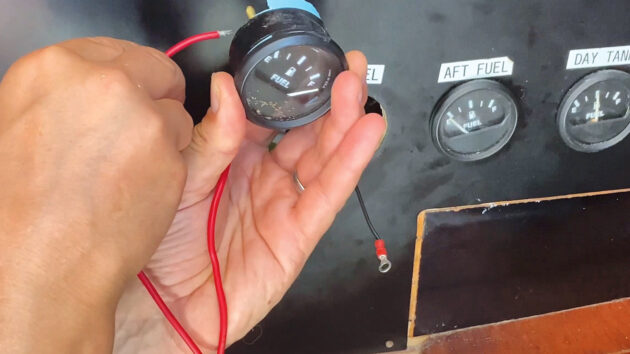
Test the gauge to see if that’s where the problem lies
Repairing gauges
Every so often, one of your gauges will stop working properly, giving no reading at all or a false reading. The problem can only be one of three things: power to the gauge, resistance in the sender, or a break in the circuit. Here’s what to look for.
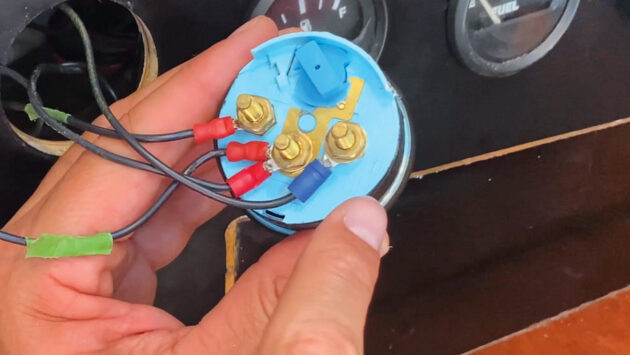
Identifying the wires
Working with your electrical system, switch off the instrument circuit before you do anything. Held in place by friction or a screw collar, remove the gauge from its mounting.
The exact configuration of the wires varies from brand to brand, but the principle is the same and there will be either three or four wires on the back, attached to terminal posts. These are: a positive DC feed in, marked ‘I’; a negative, marked GND for ‘ground’ (this may have two wires to link several gauges to the negative); the sender, marked ‘S’, which receives information from the sensor. Some gauges will also have a fourth terminal for power to a backlight.
Note, it is crucial that you never touch a positive wire to the sender or you will break the sender in the tank and probably the gauge as well.
Set the multimeter to Ohms to check the sender resistance
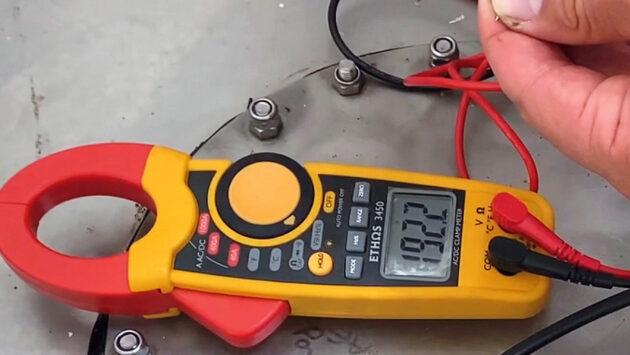
Check the voltage
First off, we check for power to the gauge. If there’s no voltage it won’t show anything. The first thing we want to do is check that the gauge itself is getting voltage.
Set your multimeter to voltage, place the probes on both terminals. In a 12V system, it should show something around 13V, depending on the state of charge of your batteries.
Check the sender
On top of the tank will be the sender, to which two wires are attached. They may be different colours but it doesn’t matter which way round they are. One will go to the sender post on the gauge and the other will go to the negative post on the gauge.
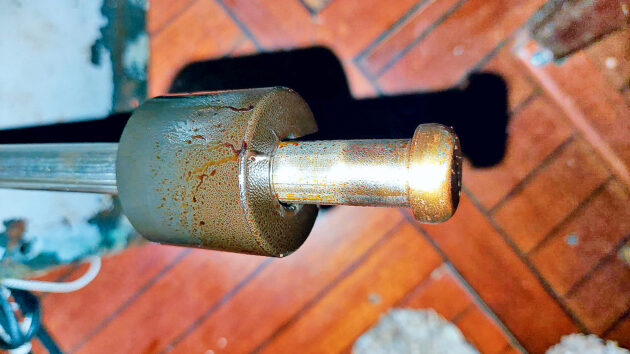
This fuel sender was coated in sticky residue from the diesel and needed cleaning
Disconnect the wires, and unscrew the sender unit – it’ll either be a float on a vertical post or a horizontal lever arm. To check the sender alters the resistance, set your multimeter to Ohms and put the probes to the wires. As you slide the float up and down, the resistance should change, though the actual numbers are not important.
Check the gauge
You can test the gauge by changing the resistance in the circuit. To remove all resistance, ground out the sender by putting a wire from the sender post to the negative, and the needle should jump across its full range as you do so. If it’s working, you then know the problem is in the wire, so have a close look for any damaged wires or loose connections. Just be careful to avoid touching the wire to the positive post.
Enjoyed reading this?

A subscription to Yachting Monthly magazine costs around 40% less than the cover price, so you can save money compared to buying single issues.
Print and digital editions are available through Magazines Direct – where you can also find the latest deals.
YM is packed with information to help you get the most from your time on the water.
-
-
- Take your seamanship to the next level with tips, advice and skills from our experts
- Impartial in-depth reviews of the latest yachts and equipment
- Cruising guides to help you reach those dream destinations
-
Follow us on Facebook, Twitter and Instagram.
Note: We may earn a commission when you buy through links on our site, at no extra cost to you. This doesn’t affect our editorial independence.